My tips for knitting Iris Schreier's Multidirectional Scarf in 2 colors
After finishing the Multidirectional Scarf OSS, a few people asked how I carried and switched the 2 yarns to get neat edges and transitions. In this post I describe what I did. It's not necessarily what Iris had in mind when she wrote the pattern, but it worked for me.
You can get the pattern for free if you join Iris' Multidirectional Knitting Yahoo!Group and introduce yourself on the message board.
Also, I'd suggest trying out these tips while you're knitting the scarf or a swatch, as they won't make much sense out of context.
Right side triangles
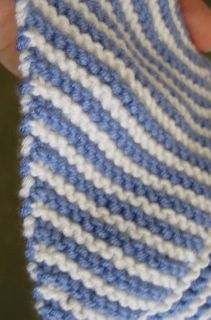
Here's a right side triangle. The hypotenuse forms the right edge of the scarf. Note the edge detail and the transition between the right side and left side triangles.

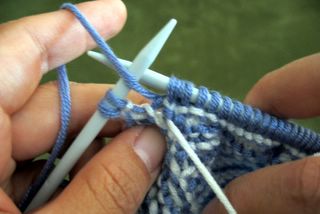
When working a right side triangle, switching from one yarn to the other occurs on the right edge of the scarf. When you finish a row on the right edge, it will look something like this. Notice that I just finished a blue row so the next row will be a white row. See how the white st on the end is loose and loopy?

Just pull the white yarn and the st will tighten up. Notice how the white yarn is in back of the blue yarn.

Drop the blue yarn (it's still in front of the white yarn).

Then continue with the pattern.

When you get to the edge of the left side triangle, the pattern calls for a SSK. After the SSK, bring the yarn to the front.

Turn and proceed as instructed.

One important note regarding right side triangles:
As you're working the last row in a right side triangle, carry the unused yarn down that last row so both yarns end up on the left edge of the scarf. Do this for all right side triangles.
Left side triangles
Here is a left side triangle--the hypotenuse of the triangle forms the left side of the scarf.

When working a left side triangle, switching from one yarn to the other occurs on the edge that is adjacent to the previously worked right side triangle (after the SSK).
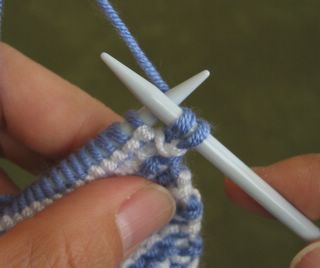
Here's the backside of the scarf right after I did a SSK. I completed the blue row and will start knitting with the white yarn after turning. Notice how the white st is large and loopy.

Just pull the white yarn to tighten the stitch. Bring the blue yarn to the front. Turn.
Now the public side is facing me. If I turn the top of the work down and peek at the back side, here is what I see. The blue yarn is on the right and the white yarn is on the left, and the yarns are not crossed.

Now proceed as instructed.

There's nothing special about the kfb on the left edge of the scarf. No slipping of sts or anything like that.
Here's what the left edge will look like.
And here's the transition between the bottom of a left side triangle and the top of a right side triangle.

You can get the pattern for free if you join Iris' Multidirectional Knitting Yahoo!Group and introduce yourself on the message board.
Also, I'd suggest trying out these tips while you're knitting the scarf or a swatch, as they won't make much sense out of context.
Right side triangles
Here's a right side triangle. The hypotenuse forms the right edge of the scarf. Note the edge detail and the transition between the right side and left side triangles.
When working a right side triangle, switching from one yarn to the other occurs on the right edge of the scarf. When you finish a row on the right edge, it will look something like this. Notice that I just finished a blue row so the next row will be a white row. See how the white st on the end is loose and loopy?
Just pull the white yarn and the st will tighten up. Notice how the white yarn is in back of the blue yarn.
Drop the blue yarn (it's still in front of the white yarn).
Then continue with the pattern.
When you get to the edge of the left side triangle, the pattern calls for a SSK. After the SSK, bring the yarn to the front.
Turn and proceed as instructed.
One important note regarding right side triangles:
As you're working the last row in a right side triangle, carry the unused yarn down that last row so both yarns end up on the left edge of the scarf. Do this for all right side triangles.
Left side triangles
Here is a left side triangle--the hypotenuse of the triangle forms the left side of the scarf.
When working a left side triangle, switching from one yarn to the other occurs on the edge that is adjacent to the previously worked right side triangle (after the SSK).
Here's the backside of the scarf right after I did a SSK. I completed the blue row and will start knitting with the white yarn after turning. Notice how the white st is large and loopy.
Just pull the white yarn to tighten the stitch. Bring the blue yarn to the front. Turn.
Now the public side is facing me. If I turn the top of the work down and peek at the back side, here is what I see. The blue yarn is on the right and the white yarn is on the left, and the yarns are not crossed.
Now proceed as instructed.
There's nothing special about the kfb on the left edge of the scarf. No slipping of sts or anything like that.
Here's what the left edge will look like.
And here's the transition between the bottom of a left side triangle and the top of a right side triangle.


7 Comments:
Thanks for giving us a phototutorial. It looks like a fun scarf project. Not too mindless, but not too challenging, either.
By Freecia, at 9/05/2005 3:14 PM
great! for the jersey i have in mind i had been looking for just this tutorial. thanks much.
greetings from south africa.
By Anonymous, at 9/06/2005 2:11 AM
The 2 young ones saw your site for the first time tonight, and a few of the comments were:
_those are really good pictures! that was smart to have someone help take the pictures
_it was smart to take the pictures in a mirror
_you mean she's famous? she has sponsors in the sidebar to her blog?
_dang look at all those things she made
...So it looks like you made quite an impression.
Later,
--Big sis.
By Anonymous, at 9/12/2005 9:34 PM
I can just picture the 3 of you around the computer cruising the blog. Pretty cool. So, to address the comments:
--Actually I don't have help taking the photos. The photos in this post were taken using a tripod and self-timer. On occasion I had SO take one or two photos, but the only ones I can think of at the moment are of the blue VK cabled cardigan. Oh yeah, and the VK diamond pullover.
--Thanks! But it wasn't my idea. If you look a lot of knitting blogs, you'll see bathroom mirror shots.
--Not famous. And no sponsors... just knitting rings I belong to or other resources I want to hightlight in the sidebar.
--Yeah, neat, huh?
Thanks for stopping by and leaving a comment. Always nice to hear from you in the ol' bloggo.
By Bogie, at 9/13/2005 3:52 PM
I love, love, love this idea. I've been surfing the net all morning looking for the best colors to make this scarf and I never would dreamed of doing this. How creative! Thanks for posting this.
By Amanda, at 5/11/2006 8:41 AM
Hi, I've been making IS's multidirectional triangle scarf with two different colors of yarn (like yours) and noted two things, one: at the end of each triangle, I had to slide all of the stitches to the other needle, so I could knit the unworked yarn down to the same end as the just-worked yarn, without adding an extra row (which sends the triangles off into all kinds of crazy directions). The second thing is, because of the uneven number of rows in each triangle, every other triangle is right side/wrong side, which looks fine on mine, but I see that your triangles all face the same direction. How did you accomplish that? Thanks so much for your help! ES
By Anonymous, at 1/30/2012 12:40 PM
Hi ES, On the last row of each right side triangle, I carried the unworked yarn across the back of the last row so both yarns end up in the correct position to start a left side triangle. It's in my post above where it says, "One important note regarding right side triangles". I don't recall doing anything special to have all the public sides of the triangles facing the same way. I thought I just followed the pattern. Sorry I can't be more help with that question.
By Bogie, at 1/30/2012 1:21 PM
Post a Comment
<< Home