FO 2005-23: Hooray for Urban Broads
Dec 29, 2007 update: The thumbs were operated on to make them convertible too. If you make these, consider making a thumb cap so you can expose the tip of your thumb. It makes picking up and holding objects easier.
Patterns:
Needles: Addi Turbos 3.0mm, Crystal Palace 3.0mm DPNs
Technique: 2 mitts on 2 circulars, tubular cast-on
Gauge: 33sts/4", stst
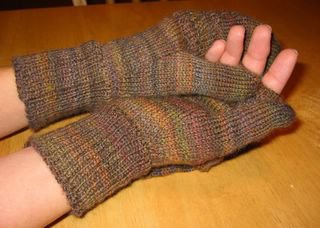
They're finished and I'm wearing them as I type. Views of the glove:


I haven't done anything to secure the mitt cap in this position--I may add something as it has a tendency to flap around.
Views of the mitt:


For back of the mitten cap, I used stitch pattern Stansfield #11 from Charlene Schurch's book


Sensational Knitted Socks
More about that book later.
To start, I knit both gloves using the Hooray for Me Gloves pattern with the following changes.
The mitten cap starts off like the Urban Necessity.
A nicer, more symmetrical decrease would start like this:
k9, ssk, *k9, k2tog* twice, k9 ssk, *k9 k2tog* twice
As I'm looking at my mitts, I wish I had done it that way. But I've already knit the mitt caps twice and I can't think of knitting the decreases again.
So there you have it, 3 patterns thrown in a Cuisinart => warm hands.
Related posts:
Mittens in California?
Phalanges
Patterns:
- Marnie MacLean's Hooray for Me Gloves
- Janis Cortese's Broad Street Mittens
- Colleen Michele Meagher's Urban Necessity
Needles: Addi Turbos 3.0mm, Crystal Palace 3.0mm DPNs
Technique: 2 mitts on 2 circulars, tubular cast-on
Gauge: 33sts/4", stst
They're finished and I'm wearing them as I type. Views of the glove:
I haven't done anything to secure the mitt cap in this position--I may add something as it has a tendency to flap around.
Views of the mitt:
For back of the mitten cap, I used stitch pattern Stansfield #11 from Charlene Schurch's book
Sensational Knitted Socks
More about that book later.
To start, I knit both gloves using the Hooray for Me Gloves pattern with the following changes.
- Cast-on both gloves using a tubular cast-on.
- Mirror the thumb gore shaping to make the left glove.
- After moving the thumb sts to waste yarn and completing that round, add a lifeline. It's a reference for the mitten cap.
- Before starting the index finger, I don't "Fold glove so that thumb is to one side and folded in half." I like having the thumb slightly forward on each glove, so I leave the gloves as they are on the needles.
- To avoid holes between the fingers, I picked up more stitches than called for and knit them together. For example if the pattern said to pick up 2 stitches, I'd pick up 2 sts & knit them together, pick up and k1 st, pick up and k1 st, and pick up 2 sts and knit them together. That makes a total of 4 new sts. Knit around until there's one st before the first new st. Knit that st and the first new st tog, k2 sts, k2tog.
- Similarly, if the instructions are to CO 2 sts between the fingers, I'll CO 4 sts. Then on the next round, k the last live st tog with the first new CO st, k2, then k2tog.
- The fingers were a little short, so I added a few rounds to each finger.
- Follow the instructions for starting the thumb, but work it on 4 DPNs.
The mitten cap starts off like the Urban Necessity.
- Pick up 33 sts along the back of each mitten. I positioned mine 3 rows above the lifeline after the thumb join, but you should put it wherever it's comfortable for you. Just make sure it's above the thumb join.
- After knitting across the back of the mitt cap, cast on 30 sts and join as described in Urban Necessity. If you'd like to have a stitch pattern on the back of the mitt, start it now. Knit a 1x1 rib along the palm side of the mitt cap.
- When you have 1 inch of ribbing, continue to work in the round and knit across the palm side of the mitt cap increasing 3 sts evenly across. Total # of sts along the palm side of the mitt cap is now 33sts. Work the palm in st st, and the back of the mitt cap in the st pattern of choice.
- *k9, k2tog, PM* around
- knit 1 round
- Decrease Round: *k until there are 2 sts before the marker, k2tog, slip marker* around
A nicer, more symmetrical decrease would start like this:
k9, ssk, *k9, k2tog* twice, k9 ssk, *k9 k2tog* twice
As I'm looking at my mitts, I wish I had done it that way. But I've already knit the mitt caps twice and I can't think of knitting the decreases again.
So there you have it, 3 patterns thrown in a Cuisinart => warm hands.
Related posts:
Mittens in California?
Phalanges
Labels: FO


6 Comments:
I must not be the only one who lives in a cold house. Some people live in Vermont and Canada while my little Californian self gets frozen at the thought of anything below 55.
They look awesome. It was really nice putting a face to the blog photos; it was fun meeting another blogger and seeing your superb work in person. Your shawl sleeps on the mannequin right next to the cash registers.
By Freecia, at 11/05/2005 11:56 PM
Very nice! I have concocted my own pattern as well from about two or three sources, then changed it some more. I like your method for the mitten flap better than mine - I knit the mitten first, using a waste yarn on the palm side at the level I wanted the flap. I take out the waste yarn, pick up stitches there and on the inside of the mitten back. I use those stitches to knit the hand fingerless gloves....
Very nice.
By Anonymous, at 11/06/2005 4:37 AM
Wow, they look great. Makes me want to get out my half-finished, half-fingered gloves and make them into an FO. Can't wait to see them in person.
By Anonymous, at 11/06/2005 8:27 AM
Thanks Freecia, Dianna, & Jeni.
And Freecia, it was nice meeting you too. I'm sure you'll be meeting a lot of Bay Area bloggers.
By Bogie, at 11/06/2005 9:52 AM
I didn't even check out the back of the cap at SnB today! How cool looking. They turned out great.
By Abigail, at 11/06/2005 9:41 PM
Your fingerless gloves pattern good I'll be making some of the gloves..
By Fingerless Gloves, at 3/31/2015 5:42 AM
Post a Comment
<< Home